IOS
iOS App Customization and Submission Guide
This guide outlines the steps to customize the K12NET app with your school’s branding and submit it to the iOS App Store. By using PWABuilder.com for app packaging and adhering to the steps below, the submission process will be smooth and efficient.
Preparation: Ensure you have an Apple Developer account and access to a Mac with the latest version of Xcode installed. It’s crucial to be familiar with the Apple App Store Review Guidelines to ensure your app complies with Apple's standards.
Step 1: Customize Your App with PWABuilder
- Go to PWABuilder.com.
- Enter the URL of your K12NET PWA and initiate the analysis.
- After the evaluation, proceed to build your iOS package, customizing icons, splash screens, and other settings as required.
- Download the iOS project package provided by PWABuilder.
Step 2: Open and Configure Your Project in Xcode
- Open the downloaded project in Xcode.
- Incorporate your school’s branding elements, including the app name, version, icons, and splash screens into the project settings.
- Confirm that your app’s Bundle Identifier is correctly set as registered in your Apple Developer account.
-
Update Setting.swift file Change the allowOrigin variable in the Setting.swift file as shown below so that the app will stay in the webview for all links that are from the k12net.com domain.
let allowedOrigins: [String] = ["k12net.com"] -
Update ViewController.swift file as shown below.
var isLoggedOut: Bool = false func webView(_ webView: WKWebView, didFailProvisionalNavigation navigation: WKNavigation!, withError error: Error) { htmlIsLoaded = false; if (error as NSError)._code != (-999) { self.overrideUIStyle(toDefault: true); // Define below lines if AuthSessionHandler.shared.isSessionActive { return; } // end of Define below lines webView.isHidden = true; loadingView.isHidden = false; animateConnectionProblem(true); setProgress(0.05, true); DispatchQueue.main.asyncAfter(deadline: .now() + 3) { self.setProgress(0.1, true); DispatchQueue.main.asyncAfter(deadline: .now() + 3) { self.loadRootUrl(); } } } } -
Update PushNotifications.swift file Change the handleFCMToken function in the PushNotifications.swift file as shown below so that the app will use device token to send notification.
func handleFCMToken(){ DispatchQueue.main.async(execute: { Messaging.messaging().token { token, error in if let error = error { print("Error fetching FCM registration token: \(error)") checkViewAndEvaluate(event: "push-token", detail: "ERROR GET TOKEN") } else if let token = token { TokenManager.shared.deviceToken = token // Add this line print("FCM registration token: \(token)") checkViewAndEvaluate(event: "push-token", detail: "'\(token)'") } } }) } -
Update WebView.swift file Change the matchingHostOrigin variable in the WebView.swift file as shown below so that the app will stay in the webview for all links that are from the k12net.com domain.
let matchingHostOrigin = allowedOrigins.first(where: { requestHost.hasSuffix($0) }) -
Update WebView.swift file Change the matchingHostOrigin variable in the WebView.swift file as shown below so that the app will stay persistent data store.
let config = WKWebViewConfiguration() // Find this line in the file //Add below line config.websiteDataStore = .default() // persistent, not ephemeral -
Update WebView.swift file Change the top of the below function in the WebView.swift file as shown below so that the app will login with ASWebAuthenticationSession.
func webView(_ webView: WKWebView, decidePolicyFor navigationAction: WKNavigationAction, decisionHandler: @escaping (WKNavigationActionPolicy) -> Void) { if (navigationAction.request.url?.scheme == "about") { return decisionHandler(.allow) } if (navigationAction.shouldPerformDownload || navigationAction.request.url?.scheme == "blob") { return decisionHandler(.download) } if let requestUrl = navigationAction.request.url{ // Add below lines let address = requestUrl.absoluteString.lowercased() if(address.contains("browse=newtab")) { UIApplication.shared.open(navigationAction.request.url!, options: [:], completionHandler: nil) decisionHandler(.cancel) return } if address.contains("logout.aspx") { AuthSessionHandler.shared.isSessionActive = false isLoggedOut = true; } // Login if address.contains("login.aspx") { decisionHandler(.cancel) if AuthSessionHandler.shared.isSessionActive == true { return } guard let components = URLComponents(url: requestUrl, resolvingAgainstBaseURL: false), let returnValue = components.queryItems?.first(where: { $0.name.lowercased() == "returnurl" })?.value, let decoded = returnValue.removingPercentEncoding, let targetUrl = URL(string: decoded) else { AuthSessionHandler.shared.appLaunchSequence(url: rootUrl, isLoggedOut: isLoggedOut) isLoggedOut = false; return } AuthSessionHandler.shared.appLaunchSequence(url: targetUrl, isLoggedOut: isLoggedOut) isLoggedOut = false; return } .....//Keep below same -
Add Keychain.swift, TokenManager.swift and AuthSessionHandler.swift files by removing .txt extension to Xcode project to enable ASWebAuthenticationSession.
Apply to k12net support to get your clientId and secretId and change below code in TokenManager.swift
    public let clientId = "apply_to_k12net_to_get_your_clientId" // must match IdentityServer client
    public let secretId = "apply_to_k12net_to_get_your_secretId"  // must match IdentityServer client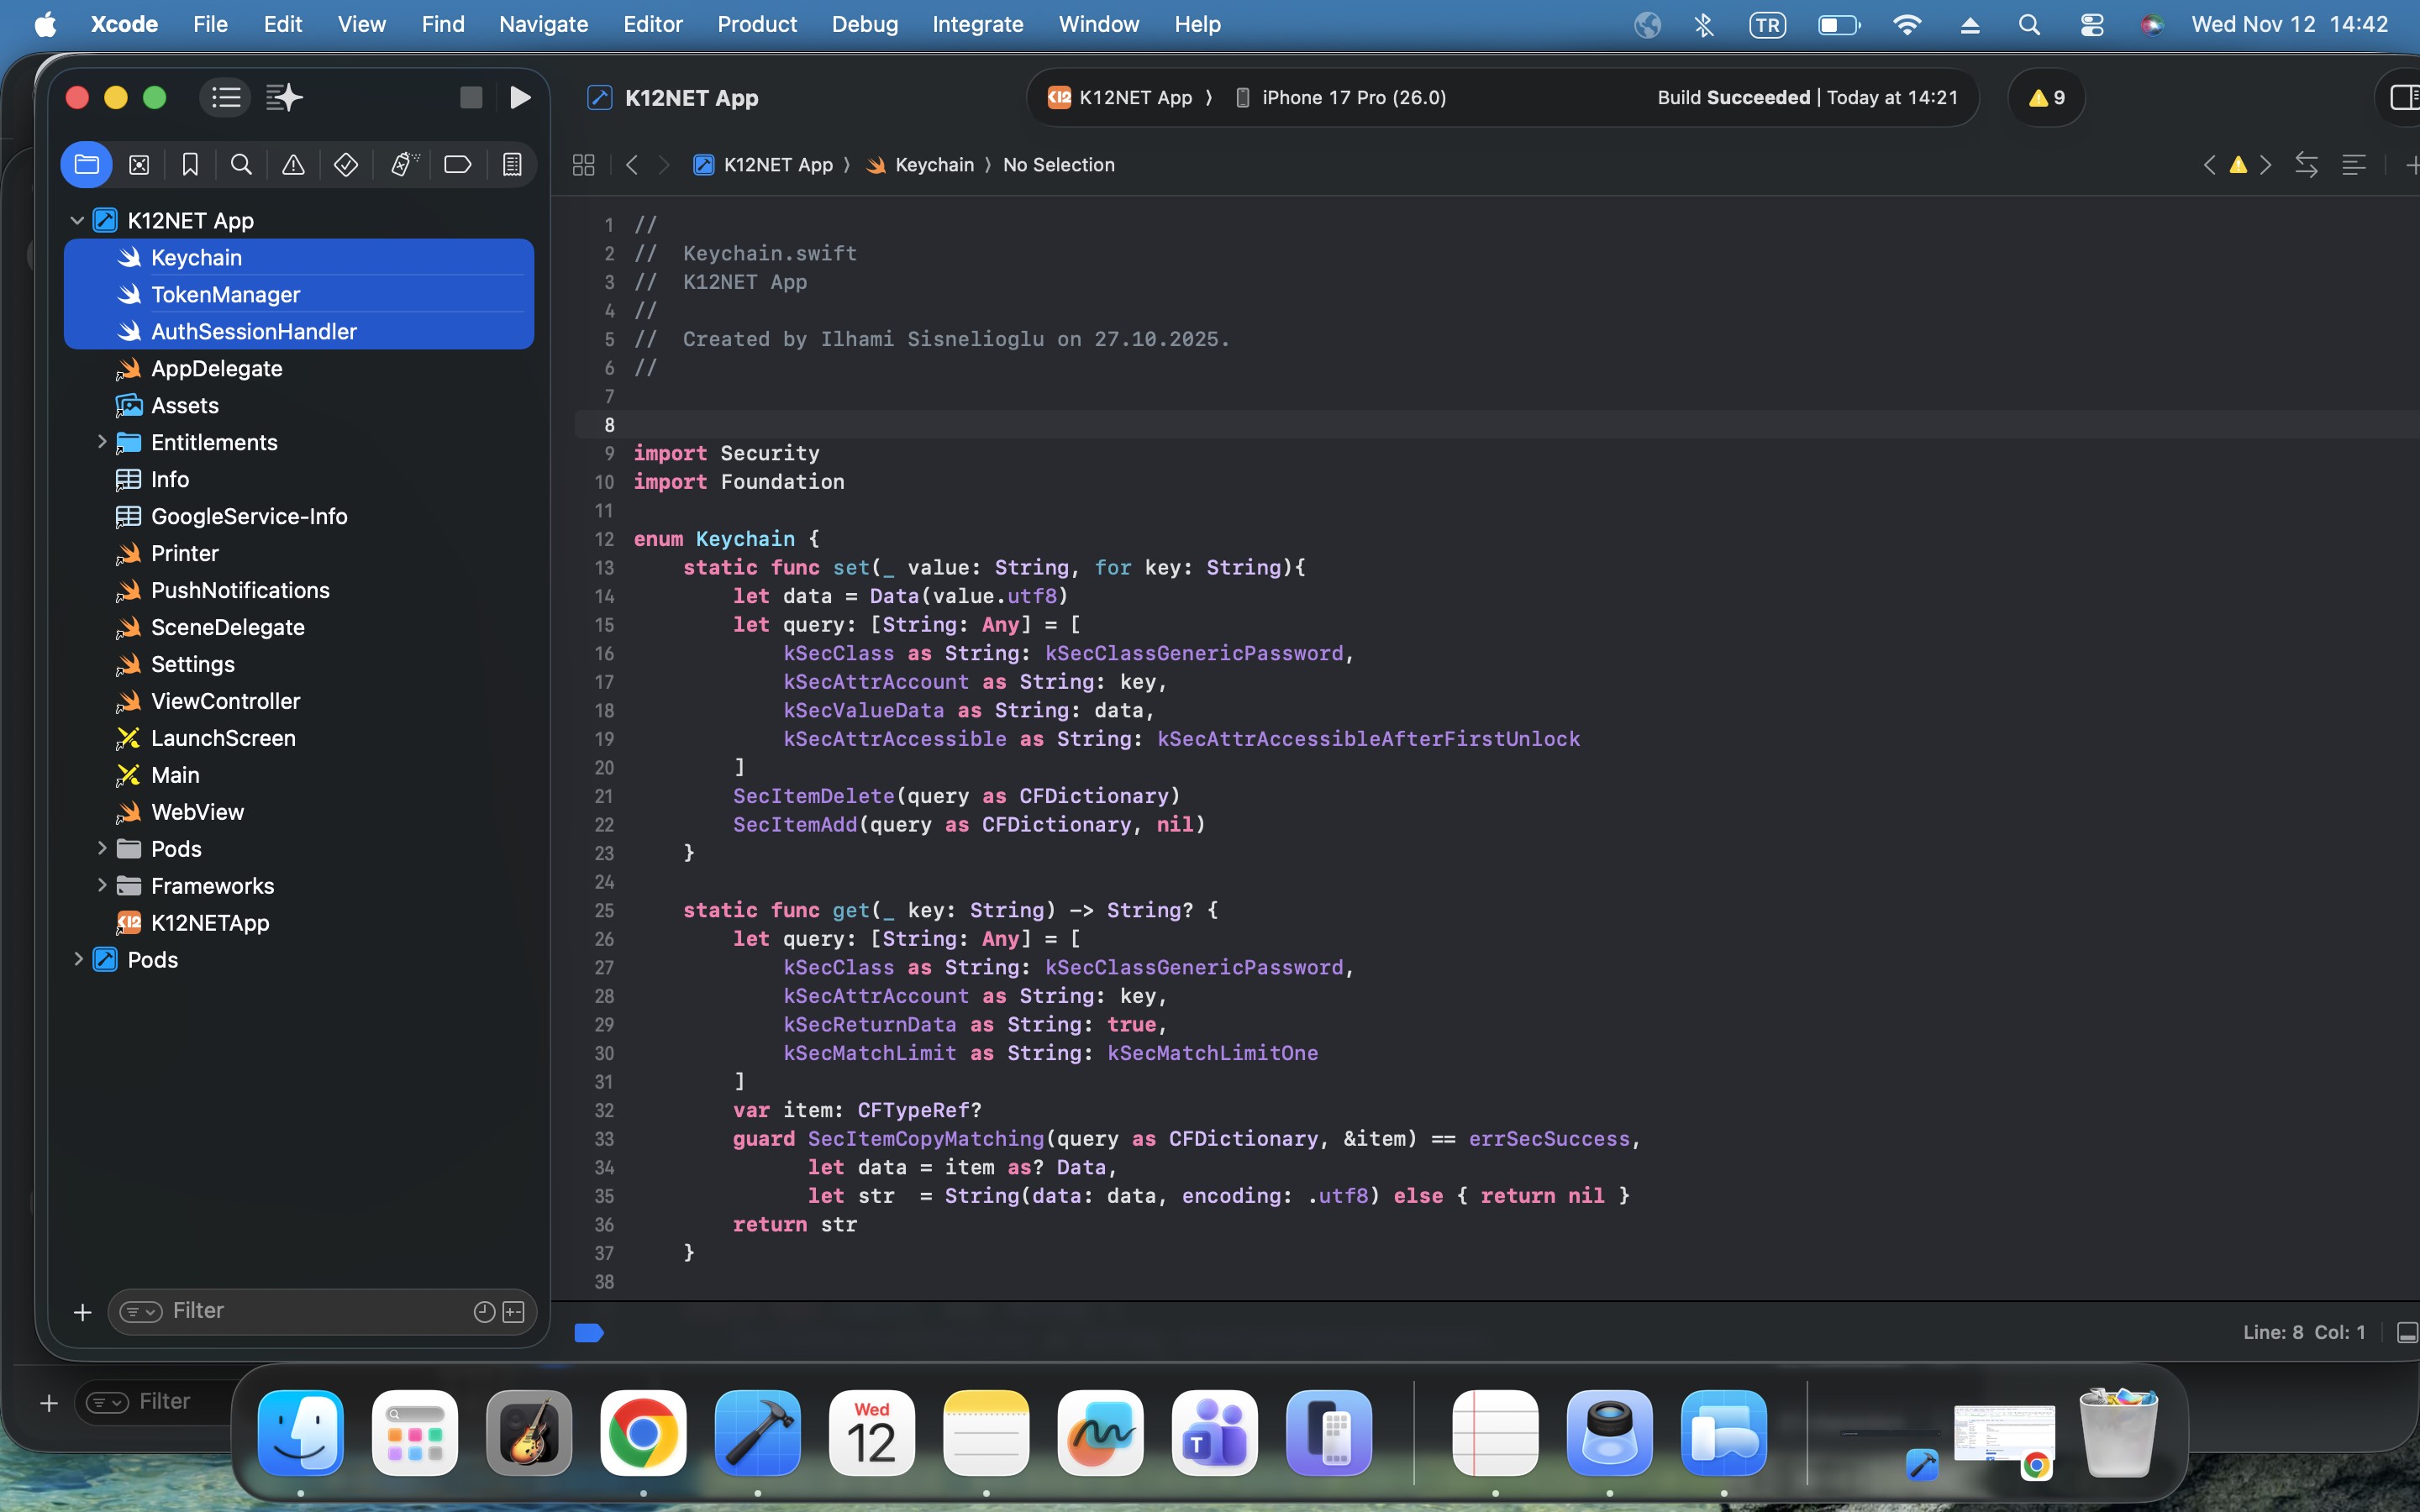
-
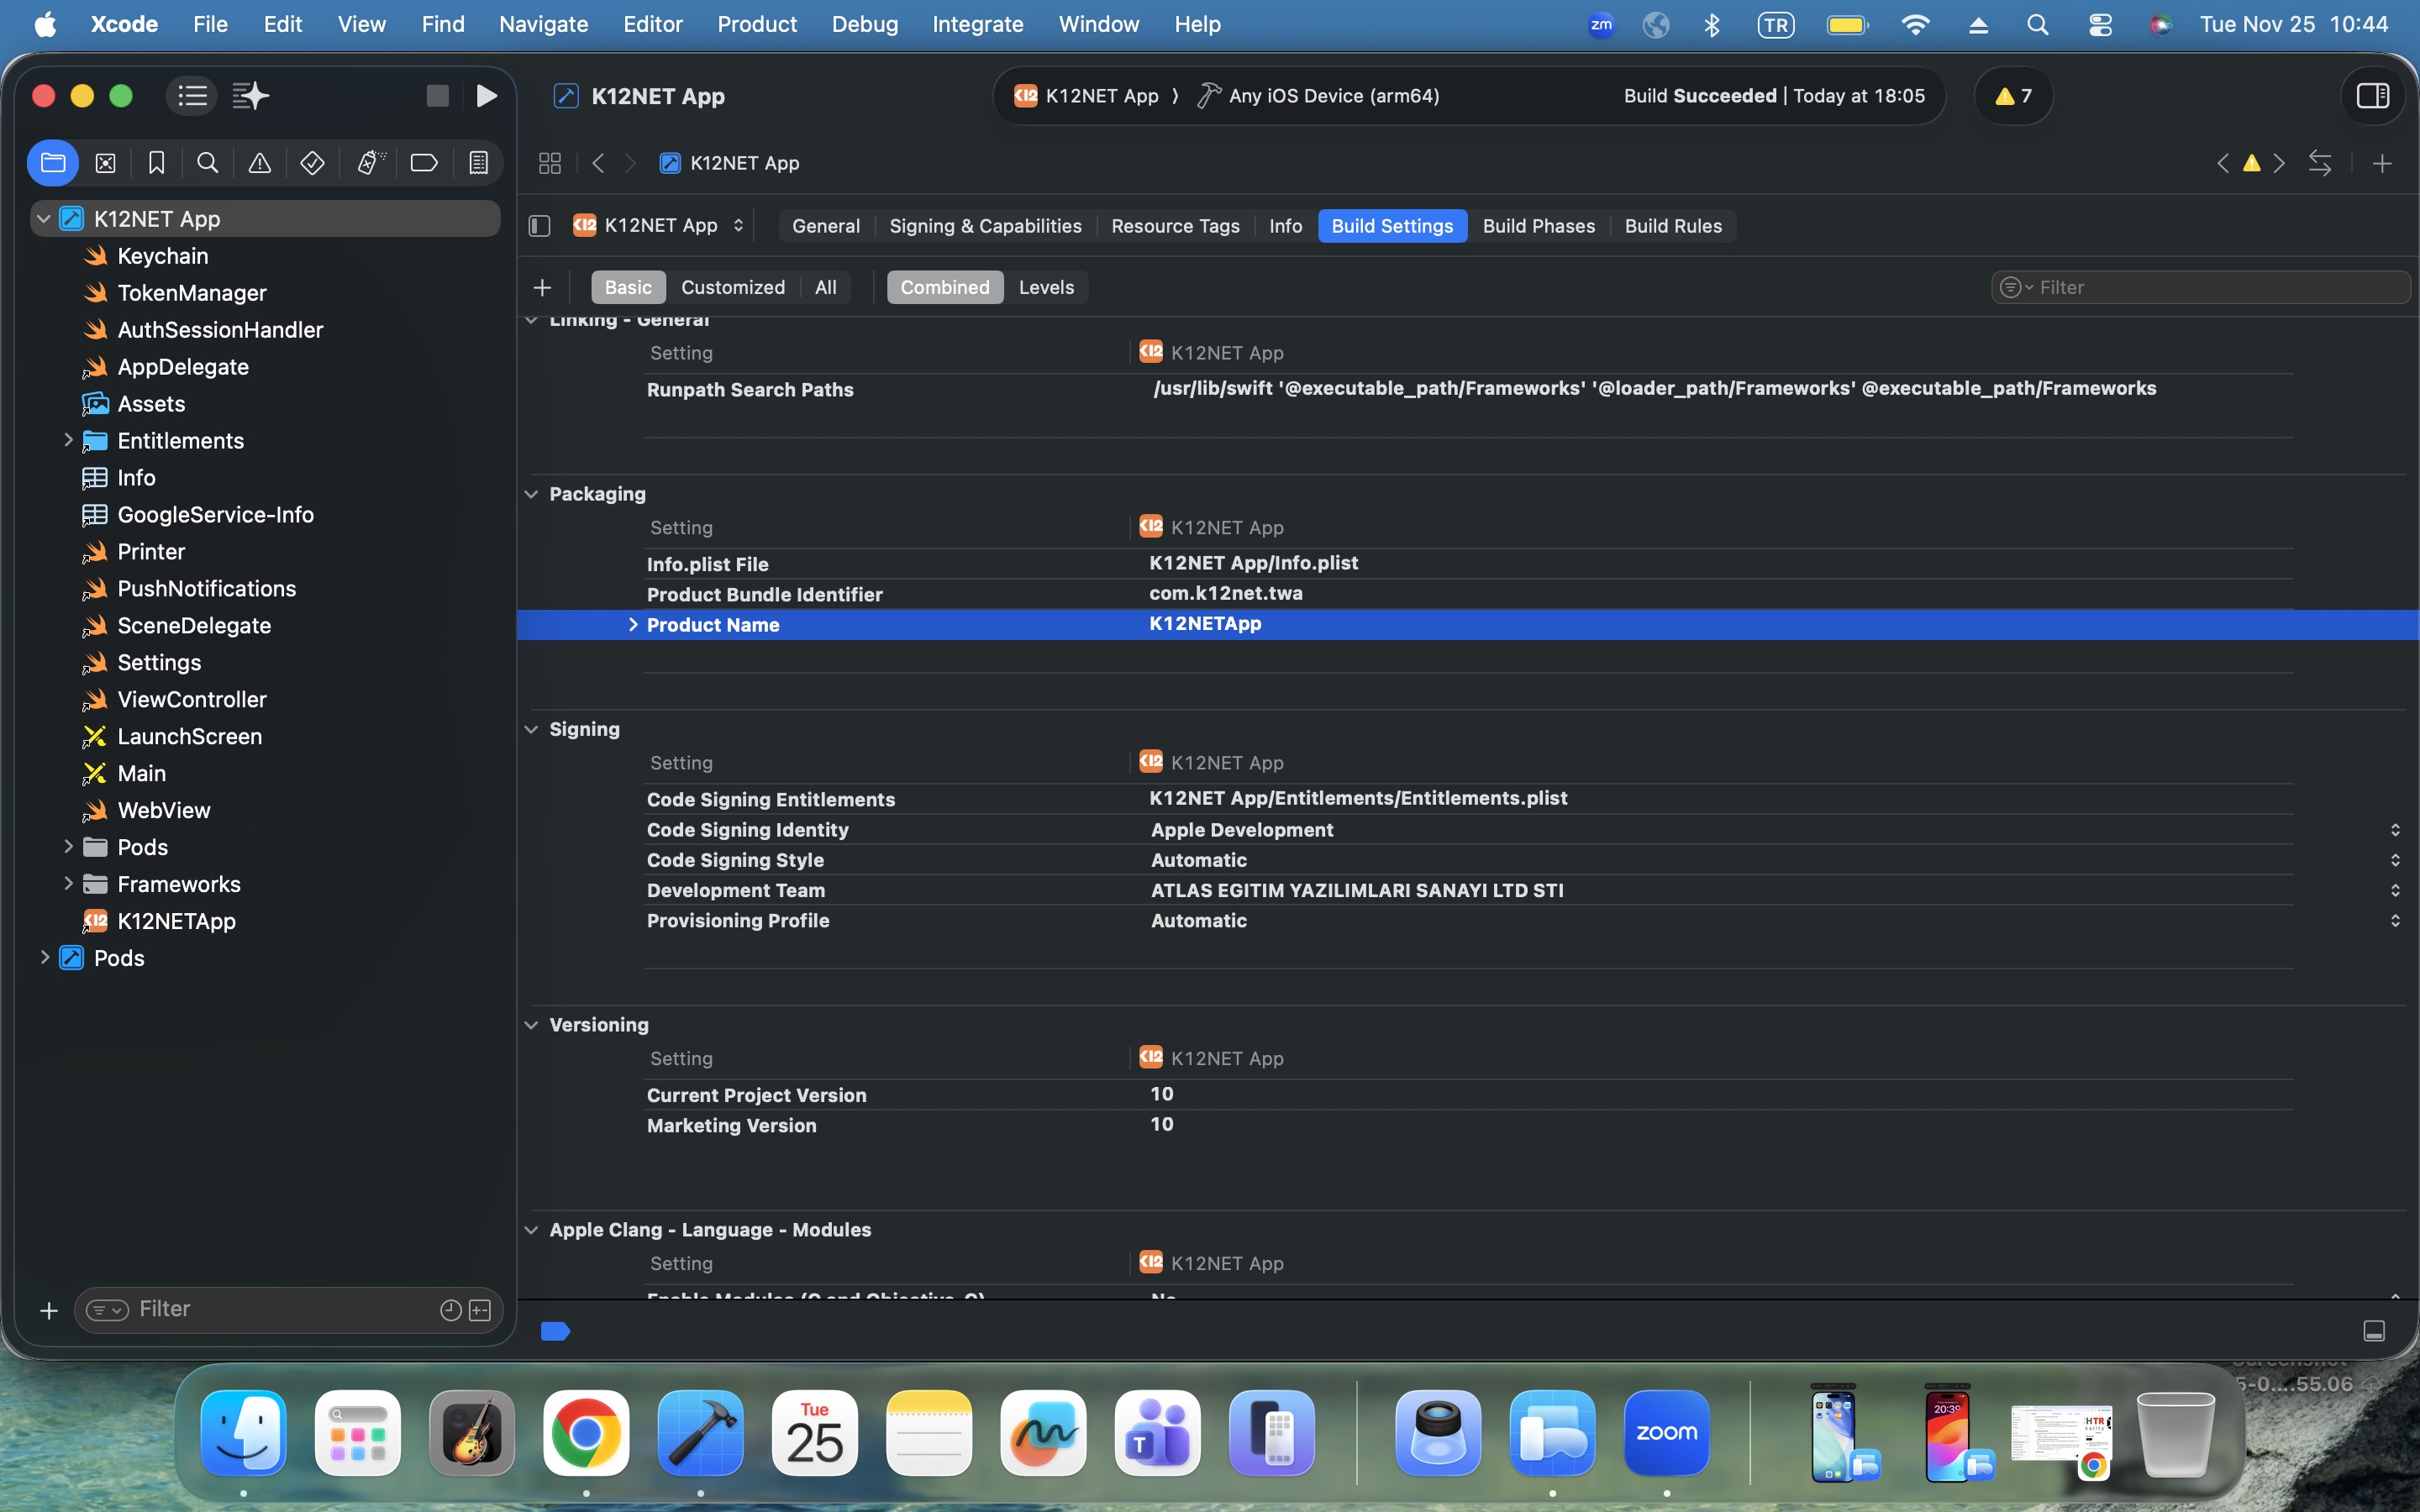
Find the below Product Name in Xcode project and change the K12NETApp with this value of Product Name row to remove build errors for K12NETApp.webview lines.
-
Update Info.plist file file as shown below.
        //Add below lines
        <key>NSLocationAlwaysUsageDescription</key>
        <string>This app requires to always access your device location to attendance region tracking when user enters and/or exits a school geofence</string>
        <key>NSLocationAlwaysAndWhenInUseUsageDescription</key>
        <string>This app requires to always access your device location to attendance region tracking when user enters and/or exits a school geofence</string>

        //Update below lines
        <key>CFBundleURLTypes</key>
        <array>
            <dict>
                <key>CFBundleTypeRole</key>
                <string>Editor</string>
                <key>CFBundleURLName</key>
                <string>com.k12net.pwa</string>
                <key>CFBundleURLSchemes</key>
                <array>
                    <string>k12net</string>
                </array>
            </dict>
        </array>

        //Update below lines and change xyz to your domain
        <key>WKAppBoundDomains</key>
        <array>
            <string>xyz.k12net.com</string>
            <string>okul.k12net.com</string>
            <string>azure.k12net.com</string>
            <string>api.k12net.com</string>
            <string>fs.k12net.com</string>
            <string>fs-static.k12net.com</string>
            <string>er.k12net.com</string>
            <string>sss.k12net.com</string>
            <string>lgssonuc.k12net.com</string>
            <string>itemeditor.k12net.com</string>
            <string>eokul.k12net.com</string>
            <string>tanitim.k12net.com</string>
            <string>support.k12net.com</string>
            <string>yardim.k12net.com</string>
            <string>azurefs.k12net.com</string>
            <string>azureer.k12net.com</string>
            <string>educore.com</string>
            <string>login.live.com</string>
            <string>accounts.google.com</string>
            <string>login.microsoftonline.com</string>
            <string>account.google.com</string>
            <string>login.microsoft.com</string>
            <string>www.google.com</string>
            <string>ssl.gstatic.com</string>
            <string>gstatic.com</string>
            <string>google.com</string>
            <string>oauth.googleusercontent.com</string>
        </array>
Step 3: Integrate Firebase Notifications
-
Receive the
GoogleService-Info.plistFile: We will supply theGoogleService-Info.plistfile tailored to your app for integrating Firebase notifications. -
Add the File to Your Project: Drag and drop the
GoogleService-Info.plistfile into the root of your project directory in Xcode, ensuring it’s added to your app's target. - Enable Push Notifications: In the "Signing & Capabilities" tab of your app’s target settings, add the "Push Notifications" capability.
- Activate Background Modes: Add the "Background Modes" capability and enable "Remote notifications" to allow your app to receive notifications when not actively in use.
-
Update AppDelegate.swift file Although all necessary firebase related code is already added to the project, you may need to update the
AppDelegate.swiftfile to uncomment the code that handles push notifications.FirebaseApp.configure() Messaging.messaging().delegate = self UNUserNotificationCenter.current().delegate = self let authOptions: UNAuthorizationOptions = [.alert, .badge, .sound] UNUserNotificationCenter.current().requestAuthorization(options: authOptions, completionHandler: {_, _ in }) application.registerForRemoteNotifications()
Step 4: Test Your App
- Utilize Xcode’s simulator or a physical device to conduct thorough testing of the app, focusing on functionality, design, and guideline compliance.
Step 5: Prepare for Submission
- Archive your app through Xcode by selecting Product > Archive.
- Use the Distribute App option to upload your build to App Store Connect.
Step 6: Submit Your App on App Store Connect
- Log into App Store Connect and choose your app.
- Fill in your app’s metadata, including descriptions, keywords, and screenshots.
- Select the build you uploaded for submission.
- Review all details and submit your app for review.
Review and Launch: The review process by Apple can take from a few days to several weeks. Once approved, your app will be available on the App Store under your school’s branding.
Important:
- Please provide us with the APNs Authentication Key by creating it in the Apple Developer Member Center and securely sending the
.p8file along with your Key ID and Apple Team ID. This key is essential for us to send push notifications on behalf of your app.
By following these steps, you will successfully publish your school’s branded version of the K12NET app on the iOS App Store, enhancing your community's engagement and digital presence.